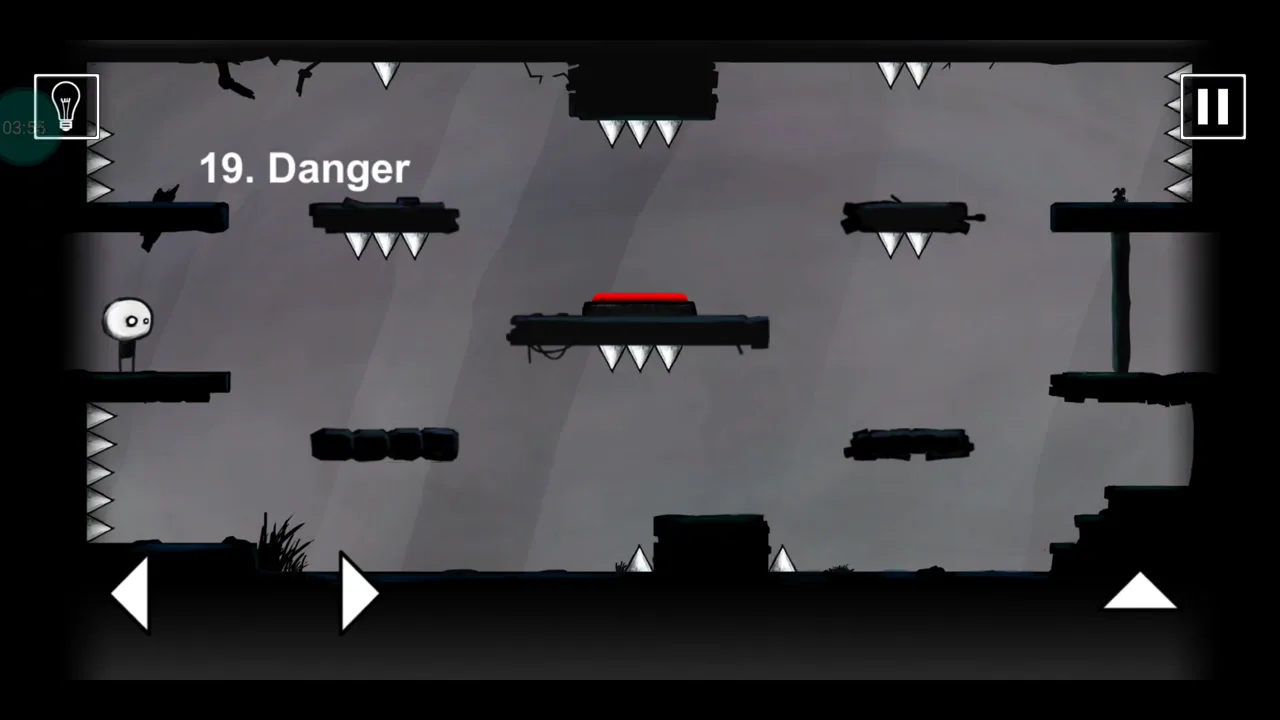
This guide matches the level title “Danger” and the verified gameplay image above. Early-level numbering is stable in our checked Android and iOS references, but later updates list different overall totals.
That Level Again Level 19 walkthroughs & guide
That Level Again Level 19, titled “Danger,” uses the same gloomy room, hazards, red switch, and right-side exit as the surrounding stages. The visual repetition is deliberate: the puzzle is not about discovering a new room but about noticing which assumption has changed. For this stage, the decisive action is to time movement around the moving spikes instead of following the normal route at full speed. The game registers the solution through reaching the red button and doorway without touching the added hazards. Once that condition is met, the right-hand door opens and the remaining task is ordinary platform movement.
The screenshot is here for more than decoration. Compare the number and title in the upper-left corner with your own screen before following the steps. If your screen says something different, use the title rather than forcing a mismatched answer. That Level Again Level 19 appears near the start of the game, where the developer is establishing the series' central joke: the room can look identical while the meaning of “press the button” changes completely.
That Level Again Level 19 quick answer: Cross the room slowly and dodge the moving spike hazards. Use short jumps, wait for each spike to clear your path, press the red button, and continue to the exit.
Step-by-step walkthrough
Read the room
Leave the starting ledge with a controlled jump and stop on the first safe platform. Identify which spikes move through the route before committing to the next landing. Keep your movement deliberate; rushing is the easiest way to turn a solved puzzle into a failed platforming attempt.
Trigger the rule
Advance only after the nearest moving spike has passed. Reach the center, touch the red button, and wait for the door to open rather than immediately jumping onward. That Level Again Level 19 will only advance after the specific input has registered.
Take the exit
Use the remaining safe platforms to approach the right side. Let the final hazard clear, then cross the last gap and enter the doorway. Keep your movement deliberate; rushing is the easiest way to turn a solved puzzle into a failed platforming attempt.
How to know the solution worked
The clearest confirmation is the door on the far right. Do not assume a press counted only because the character or finger touched the red area; watch for the doorway to open. If a spike catches the character, pause at the previous safe platform and watch one complete movement cycle before trying again. Once the door is visibly clear, no second puzzle remains. Cross the platforms, avoid the spikes, and enter the doorway. If the character dies on the route, repeat the trigger after respawning if the door has reset.
Notes and precautions
- The added spikes are lethal on contact.
- Their movement repeats in a readable cycle.
- The red button still works normally.
- Waiting on a safe platform is part of the solution.
These distinctions matter because That Level Again Level 19 is designed to catch players who repeat the previous stage's behavior without reading the new title. The title is a clue, the room is a controlled test, and the button is both an object in the world and—depending on the level—a part of the interface. When an action fails, change the kind of input before trying to perform the same input faster.
Tips and tricks
- 1Watch a full hazard cycle before moving.
- 2Use short jumps to reduce drift.
- 3Land near the middle of each platform.
- 4Do not combine two hazardous gaps into one leap.
Collectibles and secrets
That Level Again Level 19 has no required collectible. The challenge is a precision route through the moving spike pattern. We found no evidence that an optional pickup changes the normal completion condition for this stage. If you are only trying to continue the story, focus on the button-door relationship and do not search the dark background for a missing item.
Why this clue makes sense
That Level Again Level 19 is an early demonstration of That Level Again 1's design language. The developer keeps the geometry familiar so a tiny rule change becomes the entire puzzle. That economy is what makes the answer feel obvious after you see it: the room has not withheld information, but it has encouraged a habit. Read the title literally, notice what type of input it suggests, and let the door's animation confirm the result.
In short, the complete That Level Again Level 19 walkthrough is: Cross the room slowly and dodge the moving spike hazards. Use short jumps, wait for each spike to clear your path, press the red button, and continue to the exit. Use the screenshot and title together if your platform reports a different total number of levels.
That Level Again Level 19: Cross the room slowly and dodge the moving spike hazards. Use short jumps, wait for each spike to clear your path, press the red button, and continue to the exit.
What this video shows
The That Level Again Level 19 video confirms both the matching room and the input required by “Danger.” This excerpt is limited to the verified 234–254 second segment of the full walkthrough, so check the title shown in the upper-left corner before copying the move. The useful moment is brief: watch the red button and the right-side door at the same time. The door animation is the reliable proof that the activation counted.
Video is especially useful in That Level Again 1 because written verbs such as “press,” “tap,” and “step on” describe different input channels. The clip makes that distinction visible. For That Level Again Level 19, the trigger is reaching the red button and doorway without touching the added hazards. After it fires, the rest of the footage is simply a safe route across the repeated room to the exit.
Video checkpoints
- STARTConfirm the title
Pause long enough to see “19. Danger” in the upper-left. This guards against following a neighboring level that uses the same room.
- ACTIONWatch the red button
The key action is to time movement around the moving spikes instead of following the normal route at full speed. Notice the separation between moving the character and activating the puzzle rule.
- RESULTCheck the door
Look to the far right for the opening animation. The route is safe to begin only after that visual state change.
- EXITCross without rushing
The puzzle is solved, but the spikes can still kill the character. Use short, intentional movement inputs and enter the clear doorway.
What to watch closely
Do not focus only on the character. In the clip, the most important feedback happens away from the character at the doorway. If a spike catches the character, pause at the previous safe platform and watch one complete movement cycle before trying again. If your own result differs, pause your movement and compare the exact action shown in the footage. Touch targets can also feel slightly different across phones, tablets, and mouse-based builds, but the underlying condition remains the same.
Before replaying the clip
- The added spikes are lethal on contact.
- Their movement repeats in a readable cycle.
- The red button still works normally.
- Waiting on a safe platform is part of the solution.
The video host may show a different device aspect ratio or an older total level count. That does not automatically make the early solution obsolete. We match That Level Again Level 19 using four signals: the game name, level number, displayed title, and visible solution. All four agree for this guide. If a future update changes any of them, Level Clue will revise the mapping rather than silently reuse the old clip.
Practice tips from the footage
- 1Watch a full hazard cycle before moving.
- 2Use short jumps to reduce drift.
- 3Land near the middle of each platform.
- 4Do not combine two hazardous gaps into one leap.
Collectibles in the video
That Level Again Level 19 has no required collectible. The challenge is a precision route through the moving spike pattern. The video is used to verify the normal exit, not to claim a hidden-item route. No collectible detour is necessary before the door opens. If your objective is a platform achievement or Easter egg rather than basic completion, treat that as a separate task.
Text recap
You do not need to scrub through the clip repeatedly. The complete That Level Again Level 19 answer is: Cross the room slowly and dodge the moving spike hazards. Use short jumps, wait for each spike to clear your path, press the red button, and continue to the exit. Watch once to confirm the input, then reproduce it on your device. The title and image should match your screen, the door should visibly open, and the level ends when the character passes through the right-side exit.
This video mapping was checked on 2026-09-24. The clip is credited to 77boa77 Gamer, published 2020-09-18. Level Clue embeds it through YouTube's privacy-enhanced domain and does not load the player until you choose the video tab and press the load button.
Quick feedback
Did this clue help you?
Your anonymous Yes or No helps us find walkthroughs that need another check.